Je posterai les photos des travaux
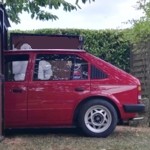
Kadett 1200S 1981
-
coincoin652
- Messages : 478
- Inscription : dim. 23 mars, 2014 18:56
- Localisation : Villers Cotterêts - Picardie -
- Contact :
Oui je fait tout chez moi, sauf la peinture que je ferai en cabine .
Je posterai les photos des travaux
Je posterai les photos des travaux
<span style='font-size:21pt;line-height:100%'><span style='color:red'>___________</span></span>
<span style='font-size:21pt;line-height:100%'><span style='color:orange'>I</span><span style='color:yellow'>O</span>\:::z:::/<span style='color:yellow'>O</span><span style='color:orange'>I</span></span>
<span style='font-size:21pt;line-height:100%'>---------------</span>
<span style='font-size:21pt;line-height:100%'><span style='color:orange'>I</span><span style='color:yellow'>O</span>\:::z:::/<span style='color:yellow'>O</span><span style='color:orange'>I</span></span>
<span style='font-size:21pt;line-height:100%'>---------------</span>
-
coincoin652
- Messages : 478
- Inscription : dim. 23 mars, 2014 18:56
- Localisation : Villers Cotterêts - Picardie -
- Contact :
Voici le travail du jour avec les outils du jour 

Donc décapage du "blackon" au décapeur puis un coup de brosse là où il faut et ponçage aux p80/p120:


Et la je découvre un ancienne choc:


Du coup je redresse un maximum puis sinto:

Donc décapage du "blackon" au décapeur puis un coup de brosse là où il faut et ponçage aux p80/p120:
Et la je découvre un ancienne choc:
Du coup je redresse un maximum puis sinto:
Dernière modification par coincoin652 le dim. 15 mai, 2016 19:53, modifié 1 fois.
<span style='font-size:21pt;line-height:100%'><span style='color:red'>___________</span></span>
<span style='font-size:21pt;line-height:100%'><span style='color:orange'>I</span><span style='color:yellow'>O</span>\:::z:::/<span style='color:yellow'>O</span><span style='color:orange'>I</span></span>
<span style='font-size:21pt;line-height:100%'>---------------</span>
<span style='font-size:21pt;line-height:100%'><span style='color:orange'>I</span><span style='color:yellow'>O</span>\:::z:::/<span style='color:yellow'>O</span><span style='color:orange'>I</span></span>
<span style='font-size:21pt;line-height:100%'>---------------</span>
-
coincoin652
- Messages : 478
- Inscription : dim. 23 mars, 2014 18:56
- Localisation : Villers Cotterêts - Picardie -
- Contact :
La suite !
Avant de démonté les ailes je voulais faire les fixations pour les pare-boue de Daewoo Nexia.


Voilà ça c'est fait. Aujourd'hui dépose des ailes et des portes pour décapé les bas de caisse et contour d'ailes arrière :


Elle avait déjà reçus quelques rustines mais quant c'est attaqué, c'est attaqué:


J'ai également un demi tour de roues qui gonflé. Une petite commande en Allemagne s'impose, bas de caisse et tour de roue
Avant de démonté les ailes je voulais faire les fixations pour les pare-boue de Daewoo Nexia.
Voilà ça c'est fait. Aujourd'hui dépose des ailes et des portes pour décapé les bas de caisse et contour d'ailes arrière :
Elle avait déjà reçus quelques rustines mais quant c'est attaqué, c'est attaqué:
J'ai également un demi tour de roues qui gonflé. Une petite commande en Allemagne s'impose, bas de caisse et tour de roue
Dernière modification par coincoin652 le jeu. 19 mai, 2016 12:54, modifié 1 fois.
<span style='font-size:21pt;line-height:100%'><span style='color:red'>___________</span></span>
<span style='font-size:21pt;line-height:100%'><span style='color:orange'>I</span><span style='color:yellow'>O</span>\:::z:::/<span style='color:yellow'>O</span><span style='color:orange'>I</span></span>
<span style='font-size:21pt;line-height:100%'>---------------</span>
<span style='font-size:21pt;line-height:100%'><span style='color:orange'>I</span><span style='color:yellow'>O</span>\:::z:::/<span style='color:yellow'>O</span><span style='color:orange'>I</span></span>
<span style='font-size:21pt;line-height:100%'>---------------</span>

-
coincoin652
- Messages : 478
- Inscription : dim. 23 mars, 2014 18:56
- Localisation : Villers Cotterêts - Picardie -
- Contact :
Oui c'est vrai qu'elle est saine par a ceraine D que je peut voir sur les forums. Le fait qu'elle a dormi dans un garage y ai pour grand chose .
Pour le longeron avant oui je vais y jeté un oeil . Il y a 2 ans j’avais fait une réparation à cette endroit mais je pense que je vais ré-ouvrir cette partie là pour mieux faire .
Les pièces de tôlerie sont commandé, j'espère les recevoir rapidement .
Pour le longeron avant oui je vais y jeté un oeil . Il y a 2 ans j’avais fait une réparation à cette endroit mais je pense que je vais ré-ouvrir cette partie là pour mieux faire .
Les pièces de tôlerie sont commandé, j'espère les recevoir rapidement .
Dernière modification par coincoin652 le mer. 18 mai, 2016 08:46, modifié 1 fois.
<span style='font-size:21pt;line-height:100%'><span style='color:red'>___________</span></span>
<span style='font-size:21pt;line-height:100%'><span style='color:orange'>I</span><span style='color:yellow'>O</span>\:::z:::/<span style='color:yellow'>O</span><span style='color:orange'>I</span></span>
<span style='font-size:21pt;line-height:100%'>---------------</span>
<span style='font-size:21pt;line-height:100%'><span style='color:orange'>I</span><span style='color:yellow'>O</span>\:::z:::/<span style='color:yellow'>O</span><span style='color:orange'>I</span></span>
<span style='font-size:21pt;line-height:100%'>---------------</span>
-
coincoin652
- Messages : 478
- Inscription : dim. 23 mars, 2014 18:56
- Localisation : Villers Cotterêts - Picardie -
- Contact :
En attendant de recevoir mes bas de caisse j'ai continué sur une de mes ailes arrière. Je voulais enlevé de l'épaisseur de peinture, pour en finir j'ai presque tout enlevé !

En enlevant le joint de coffre j'ai remarqué que la feuillure était pas mal rouillé avec perforation par endroit : va falloir joué du mig .
[URL=http://www.hostingpics.net/viewer.php?id=585521DSCF7056.jpg]


J'ai également décapé l'intérieur et l'extérieur d'une aile avant. Elle avait déjà était changé par une d'occas, je ne vous raconte pas l'épaisseur de peinture qu'il y avait dessus
A bien faire j'ai dessoudé la tôle qui vient ce vissé sur le pied milieu .


Et pour finir hier j'ai reçus les bas de caisse et tour d'aile, M.Leidinger envoi les pièces rapidement !

En enlevant le joint de coffre j'ai remarqué que la feuillure était pas mal rouillé avec perforation par endroit : va falloir joué du mig .
[URL=http://www.hostingpics.net/viewer.php?id=585521DSCF7056.jpg]
J'ai également décapé l'intérieur et l'extérieur d'une aile avant. Elle avait déjà était changé par une d'occas, je ne vous raconte pas l'épaisseur de peinture qu'il y avait dessus
A bien faire j'ai dessoudé la tôle qui vient ce vissé sur le pied milieu .
Et pour finir hier j'ai reçus les bas de caisse et tour d'aile, M.Leidinger envoi les pièces rapidement !
Dernière modification par coincoin652 le sam. 21 mai, 2016 13:15, modifié 1 fois.
<span style='font-size:21pt;line-height:100%'><span style='color:red'>___________</span></span>
<span style='font-size:21pt;line-height:100%'><span style='color:orange'>I</span><span style='color:yellow'>O</span>\:::z:::/<span style='color:yellow'>O</span><span style='color:orange'>I</span></span>
<span style='font-size:21pt;line-height:100%'>---------------</span>
<span style='font-size:21pt;line-height:100%'><span style='color:orange'>I</span><span style='color:yellow'>O</span>\:::z:::/<span style='color:yellow'>O</span><span style='color:orange'>I</span></span>
<span style='font-size:21pt;line-height:100%'>---------------</span>
-
coincoin652
- Messages : 478
- Inscription : dim. 23 mars, 2014 18:56
- Localisation : Villers Cotterêts - Picardie -
- Contact :
Hier après midi opération découpage, une doublure est bouffé. Il falloir trouvé de la tôle pour réparé ça !


Dernière modification par coincoin652 le dim. 22 mai, 2016 10:23, modifié 1 fois.
<span style='font-size:21pt;line-height:100%'><span style='color:red'>___________</span></span>
<span style='font-size:21pt;line-height:100%'><span style='color:orange'>I</span><span style='color:yellow'>O</span>\:::z:::/<span style='color:yellow'>O</span><span style='color:orange'>I</span></span>
<span style='font-size:21pt;line-height:100%'>---------------</span>
<span style='font-size:21pt;line-height:100%'><span style='color:orange'>I</span><span style='color:yellow'>O</span>\:::z:::/<span style='color:yellow'>O</span><span style='color:orange'>I</span></span>
<span style='font-size:21pt;line-height:100%'>---------------</span>

J'ai regardé chez Leidinger Tuning, il a seulement les tôles d'extérieur, comme tu as déjà.
La tôle de 0,5 ou 0,75MM en 1 x 2mtr. est vendue dans le commerce professionnel, mais jusques ou descend cette doublure ?
Est ce que en bas c'est soudée à la tôle qui passe derrière ?
La tôle de 0,5 ou 0,75MM en 1 x 2mtr. est vendue dans le commerce professionnel, mais jusques ou descend cette doublure ?
Est ce que en bas c'est soudée à la tôle qui passe derrière ?
<span style='font-size:8pt;line-height:100%'><span style='font-family:Arial'>[i:j1dk]<span style='color:orange'>Let's make cars better</span>[/i:j1dk]</span></span>